Here's what you'll need:
- a piece of fabric at least 2-3 inches x 44 inches (To make your frayed strip...lay the fabric with the selvage edge facing you. Measure over at least an inch and make a small notch with your scissors, rip the fabric all the way to the end. now you have a nice frayed edge!)
- A plastic or elastic head band, your choice. ( I happened to have an elastic one on hand.)
- a couple of pipe cleaners (thanks to a suggestion from a friend!)
- felt in your choice of colors and shapes (I used flowers in colors that coordinated with my fabric.)
- needle, thread, scissors
This is how you make it:

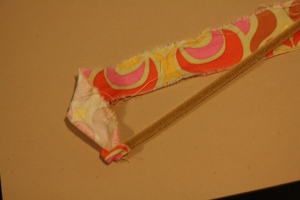
Once you have your fabric strip ready, place it at the end of the pipe cleaner, making sure to cover the end, and begin to wrap.
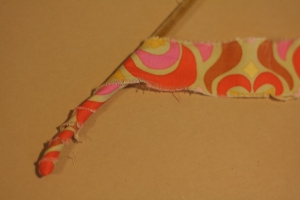
 Continue to wrap the fabric at an angle.
 As your wrapping the fabric, also start wrapping the pipe cleaner into a circular spiral type shape.
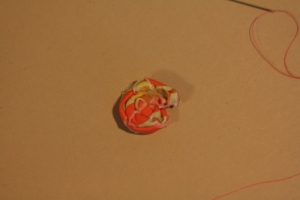
 Once you reach the desired size, cut the pipe cleaner (if there's any length left) and them trim the fabric just a little longer. Cover the end again with the little extra length that you left.
 Next, with your needle threaded, begin sewing on the backside of the rosette. (You can choose which side you like better for the front and back.)
 Run the stitch from one edge to the other and repeat a couple of times. The stitch shouldn't be visible from the front. Tie the end off, this will keep your rosette from coming apart.
Next place the head band in between the rosette and the felt.

Sew the rosette to the felt, making sure to sew through the elastic band if using one. Tie off the end once completed.
 It should look like this. Now, repeat, if using more than one flower.
 I happened to use one big and two small rosettes.
 Now, go and admire your work.
Enjoy!!
We would love to see what you've made using our tutorial. Join our Flickr group!!!
http://www.flickr.com/groups/sewhipmama/


Thank you for this!!! I have been trying to figure out how to make those little rosettes! I don't know why I didn't think of this. Haha. Thank you!
ReplyDeleteThanks! You'll have to post pictures if you make some of them!!
ReplyDeleteThis is so pretty! Thanks so much for adding these to the One Pretty Thing Flickr pool. I'll be linking in Sunday's Weekend Roundup.
ReplyDeleteThanks so much, can't wait to check it out!!!
ReplyDeleteJust came over from One Pretty Thing. This is fantastic. I just made some of these using a different tutorial on the internet and yours looks so much easier. Can't wait to make some for myself. An a great way to use the pipe cleaners that are no longer "new" because the kids have bent them all out of shape. Thanks for posting this!
ReplyDeleteThat's right, it's almost fool proof! Thanks for stopping by!
ReplyDeleteKara, you are soooo creative!! Love your blog!!
ReplyDeleteThanks!!
ReplyDeleteThanks for the tutorial! I LOVE the headband. I made two for my daughters last night. I had a terrible time sewing the rosettes, which doesn't make sense--looks like it should be easy. Maybe I had them too tight? Anyhow, pictures on my blog... http://justonemorepaigeontheinternet.blogspot.com/2010/02/impromptu-photoshoot.html
ReplyDeleteSorry to hear that! I found that using a heavy duty needle really helps when you're sewing through lots of layers. I think that's probably what I have laying around the house. You're headbands are SO cute!! I love them with the dresses. You did a fantastic job. So glad that you shared them!!!!
ReplyDeleteLOVE this. Thank you!
ReplyDeleteThanks, glad you like it!!
ReplyDeleteGreat tutorial!! I'm going to try it straight away. I am a bit addicted to headbands.... I like them more than my kids...but I've got short hair.
ReplyDeleteLove your blog! Thank you!
Thanks. I love headbands. I think I could easily post a tutorial about them every week, but that might seem a bit crazy!
ReplyDelete[...] Rosette headband from Sew Hip Mama [...]
ReplyDelete[...] from the back, make sure to sew through all layers. (This is just like the way you sew this and this.) Finish off the end with a good strong [...]
ReplyDeletewhat a brilliant idea! i tried making a bunch of these using my hot glue gun, but ended up burning myself...
ReplyDeletemaking rosettes now. may die cut the felt tomorrow at the school district office.
ReplyDeleteSo I saw your post a good while back and didn't leave a comment but I love this! Now I have finally come back to this tutorial to make a bunch of them for my daughter and her friends. Can't wait to get started. Thank you for this!
ReplyDelete