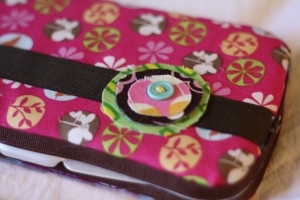
 A friend asked if I would make cute and girlie wipes case that wasn't too baby-ish. Immediately I knew that we needed bright bold colors and patterns and a fun little accent on top. So today I present to you this fun wipes case.
I based the wipes case loosely on this one. Here's what I did...(sorry, didn't take pics on this part today. I will try to post some in the next couple of days!!)
- 1 wipes case (I used the small Huggies brand one)
- fabric 1/4 yard (you will only need about 9 x 10-11 inches though.)
- one sheet of felt
- ribbon 1 yard or so
- any type of decorative accents for the top such as wide ribbon or circular accents (how to to follow)
- glue gun and sticks, scissors, marker
So to begin, open and lay your wipes case on top of your felt. Trace around it with your marker. Cut this out. I cut it into two pieces (at the part where the case folds in half)
I glued each piece to it's side of the case. Using a line of glue only around the perimeter, and gluing in small increments, to avoid it drying before I get the felt smoothed out.
I repeated this process with the main fabric, only adding a 1/8-1/4 extra fabric allowance to hag over the sides more than the felt.
If you want to add a ribbon across the top do so now. Glue in place wherever you want it.
Start gluing the ribbon around the edge, smoothing your main fabric as you go. Once you get all the way around, cute the ribbon leaving just enough to overlap and glue the last part. Repeat with the other side.
Your case should be finished now...to add the accent to the ribbon.
For the circular flower thing...
- fabric scraps
- fusible webbing ( I used craft fuse)
- button
- scissors, needle, embroidery thread
 First adhere your scraps to your fusible webbing. Cut out circles in various sizes.
 Next stack them together.
 Next grab your needle and thread. Sew the button in place.
Tie off the back.
 Now it's finished. Decide where you want it. For the wipes case, you'll glue it in place.
 Now you are finished. Despite what it's actually for, at least it's pretty!

We'd love to see your work!! Show us, please!!!!


No comments:
Post a Comment